What are wobble springs?

Wobble springs are a plastic spring with two clear plastic adhesives discs on either side which you can attach to any embellishment to add a “fun” element to your card or scrapbooking layout.  They look like this.

wobble - pic 1

Here is what they look like when they are attached.

wobble - pic 3

And here is a card I made using the wobble spring.

wobble - pic 2

Well you can’t see it but the zebra wobbles around on the card when lightly pushed.  I did think about doing a video but decided it wouldn’t be that exciting.  Just think of those cards in the shop where the pretty bit used to bob around – that’s the effect you get when you use a wobble spring.

They are great fun for you when making and the recipient, so what are you waiting for.   Get to it.

Kat

How to make cards using the same basic design

OK I know it is trendy and popular now to use card sketches but I have always used them to record my card designs.  So I thought I would show you a couple of examples of how to use a basic two “panel” design in three different ways.  The card front is split into two patterns and then divided with an embellishment.  A focal point is provided by using die cuts and stamped images.

The first has a single patterned panel but being on textured card the use of the ric rac gives it the appearance of two panels.  The co-ordinating die cuts completes the look.

two panel - pic 1

The second one has two complementary patterned papers from the same paper stack used on each side with a similar themed stamp used and coloured to match.

two panel - pic 2

The last one which I think is the most creative using two green panels with a vintage lace separating and combining the panels with two gorgeous die cut butterflies.  Both butterflies follow the theme of the card – one from a lace like paper and the other from a deeper green patterned paper.

two panel - pic 3

So next time you are creating a card think about how you can use the same design in different ways to create a few more cards for your stash.

Happy Crafting.

Kat

How to make a triangle gift box – perfect for treats!

A love little gift boxes particularly those which can be made quickly easily and without too much measuring and pfaffing about. So it is no surprise that I love triangle gift boxes. You start with a rectangle, A5 or 5×7″ card is perfect and then score as shown below.

triangle gift box - 1

Then fold all sides towards the centre line (running length wise e.g. short side to short side). See below.

triangle gift box - 2

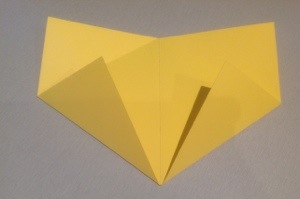
Then the tricky bit with all sides folded in, fold short side to short side and hole punch the two left pieces and then the two right pieces. See the photo below.

20130314-180532.jpg

20130314-180539.jpg

Thread a ribbon (I’ve used black so it is easier to see) through the holes on both sides and tie a box. Presto! A cute triangle gift box ready for decorating and filling with goodies.

20130314-180739.jpg

I think I will make and decorate a few of these for easter in pastel colours and maybe some in orange, yellow and blue!  Whilst I am happy for you to use the designs to raise funds for charities and not-for-profit organisations please do not use these commercially. Till next time.

Kat

How to make a birthday card from offcuts

Todays blog is about birthdays and specifically how to use your offcuts to create a cool one. This is my very first original design. I started with a simple challenge of using little offcuts (2cm wide x 6cm high) as candles. Initially I used glitter glue to draw a flame shape but now I have purchased a nice leaf punch which also works fantastically although I still do like the look of the glitter flame. I use any material for the candle base – corrugated card, foam, patterned paper, embossed paper, card and keep these in various sizes in a snap lock bag ready to go.

I find, as I always like to keep stock on hand for myself, to give away and lately to add to my etsy shop it is a big time saver to make multiple cards using the same design. This simple candle can be used on its own, in pairs, in trios, with or without a background or a suitable message.

The trio of cards pictured below took around 10 minutes to make with most of the time taken up by settling on the colour scheme, background and message to be included.

candle cards 2

candle cards 1

Whilst I am happy for you to use the designs to raise funds for charities and not-for-profit organisations please do not use these commercially. Till next time.

Kat

A special milestone – 30th birthday

Yes I have been slack in not posting since my furious crafting over christmas.  To be honest I have been making jams, preserves and chutney and trying to be good and not spending too money.  However I did get some gift cards and $ for xmas so have acquired some embossing templates, stamps and various other bits and pieces to partially restock so am now back into it.

Some of my younger friends are reaching their 30th birthday and are scared!  For me its seems a lifetime away when in reality it was 11 years ago.  Anyway I decided to make something special for their 30th birthday cards and have been pondering what to do.  It came to me whilst I was watching tv and I promptly turned off the tv and set to work.  It was really very simple idea – a shaped number 30 card.  I thought it would be easy to do as I have a cricut, computer and the cutting software.

Well it took a few hours to get the right fonts picked out, then weld and mirror and to make sure when folded it was actually a mirror image.  It took another 1/2 day to work out how to export the image and turn it into a svg which cut the entire shaped card in one cut rather than the single letters.  But now I feel I have almost mastered it.  Below is the 30th card I made for one of the boys.  I think it turned out fabulous.

shaped card

finished card

I am currently playing with other shaped “milestone” cards as we have a 90th, 80th, 60th, 50th and a number of 40th’s to go this year.  Should you have a diecut machine and want a copy of the 30th shaped based card (SVG file) or the original cricut svg project file (which also has the numbers on a separate layer by themselves but not the cupcake pictured) please contact me and I will happily send to you for your own personal use.

Happy crafting

Kat

Christmas project 3… candles

OK so a few years ago we were intrigued by gel candles and made at least 40 shot glass size candles for gifts. Turns out I had left-overs of this as well although only enough wicks (they need to be zinc core) to make 6 candles. Helpfully the gel for the candles was already coloured green and had gold glitter so just a quick refresher how to make, purchase of some shot glasses and done. At 50c a pop – quite happy and once wrapped they look fantastic.

But I also had a hankering to try washi taping some tea lights so I headed off to ikea and bought some vanilla scented ones (none of those boring white ones) along with small (just larger than the tealights) and larger cup like tealight holders. Then I wrapped the tealights in pairs with different colour washi tapes and hey presto 6 more gifts for $12. I used printed xmas lolly bags (left over from last year) to wrap the shot glasses, single wide tealight holders with 3 wrapped tealights and then after a bit of experimenting made 3 boxes to hold 3 small tealight holders and 9 tealights. I hope the recipients will be happy with these little bursts of colour.

Katrina

P.S. If anyone wants the dimension for the tealight box send me a message and I will post.

Paper is king!

Yesterday I discovered my personal supply of cards is a bit low thanks to the opening of my etsy store and a few birthdays. Today the weather is in the low 20Cs, windy and overcast even though it was a very hot summer day of 36C earlier in the week so it is a perfect day for crafting.

Today’s challenge use some of the offcuts I have been hoarding and to make the paper the king of the card. Once paired with some sentiments and die cuts from my birthday collection box the resulting cards are beautiful.

20121028-152050.jpg

What else do you have on your desk you ask? Well I always keep a photo box full of standard 5×7″ cards organized by colour, my baby and middle xyron, baby cricut, baby and large cutter, toolbox (old biscuit tin is my favorite for this) and an old ice cream container for the rubbish. Trying to be more environmentally friendly I also have a plastic tub at my side for all the paper offcuts.

20121028-152403.jpg

Katrina

What to do with free patterned papers

We all get the free papers in the craft magazine but I often wonder what do with them? Yes they are pretty but also printed on quite flimsy paper and often you can see the other design on the reverse side. Ok I admit I am a bit picky but when you have been making cards for awhile your standards change.

Last week though I had a lightbulb moment what if I cut the sheets into 5 1/2″ strips so that they fit through my xyron then stick them to white card (i used the back cover from a stack of printed papers). Next step see which ones are too transparent and which ones are ok, eliminate the circle ones (tad to difficult for moi to cut by hand plus I am already recycling) and cut out.

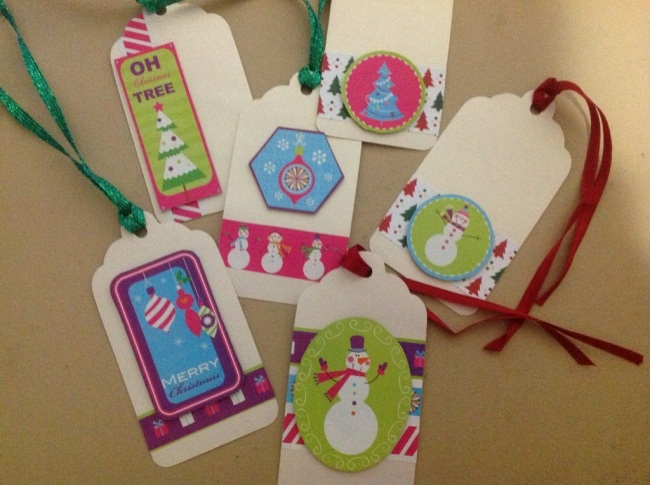
One my projects (see pic below) was to decorate some tags to add to a girlfriends birthday present. I cut strips of the background paper, adhered to the tag then added the cut out images with some double sided foam dots. Once topped with some ribbon it was a fabulous set of 6 unique christmas tags for under 50 cents.

20121024-165905.jpg

Happy World Card Making Day!

I am all in favour of a day dedicated to my most favourite craft – card making!  My challenge for the day, apart from the heat (a lovely 36C in Brisbane, Australia), was to use Kaisercraft Christmas Carnival 6″ Paper Pad to create a set of 10 christmas cards for a friend of my mum’s.  I am sorry to say, that this is last years design so you may or may not be able to buy it.  I luckily discovered a few months ago a Kaisercraft outlet only 15 minutes from me tucked away in a quiet location just near a large hardware store.  The bargains were truly fantastic with most items 90% off plus gift bags for shopping there.   Needless to say all of my crafty friends received a gift bag from me of Kaisercraft products.

But I digress, all of these cards were made from the Kaisercraft paper pad (with the exception of a few inches of silver crochet thread).  Modern, funky and full of the joy of the upcoming festive season.  The best part is that I still have enough left over to make another 15 or so cards.  So, even if you aren’t a card maker or into scrapbooking, have a look for one of these “all-in-one” paper packs and see what you can create.

Hope you have had a productive World Card Making Day!

Katrina

What can I use in my bigshot?

Well I have been slack and not posted for a while but I have been “playing” with my bigshot.  Given that I am only using embossing folders as I have already invested in a cricut my quest has been to work out what scraps of paper, card and other items I can actually use in the bigshot.

If you google you will find an endless list but that isn’t much help.  So this is what I have found out this far:

  • Bazzill/AC cardstock – embosses nicely gives a smooth edge
  • Foil cardboard – the kind you buy the kids to make stuff out of embosses fantastically, very clear & precise and as a bonus readily available and cheap!
  • Stardream/Opal papers – embossed fantastically, clear image.  2 pieces seem to emboss the same as 1.
  • Glitter card – embossed ok but difficult to see against the glitter
  • Acetate/clear packaging (including from your embossing folders!) – embossed fantastically, nice deep images which are clear.  So don’t throw away that clear packaging cut it up and use it.
  • Printed scrapbook paper/gift wrapping – embossed nicely, need to consider the pattern on the paper vs your embossing folder.  Ideally use at least 2 pieces of paper at a time
  • Vellum – plain and printed work great, gives a nice embossed finish but not clear images.  You need to use at least 2 pieces at one time.
  • Wallpaper – produces a nice soft embossed image

All of these are pictured below.

Different media embossed with big shot

Endless choice

Top row from left – bazzil, foil board, stardream, wallpaper.

Bottom row from left – wrapping paper, vellum, clear packaging, printed paper.

My girlfriend tested alfoil – you need to double up twice, it will crease-up a little around the embossed image so don’t expect a pristine flat piece of alfoil.  Brown paper also works well.

Other household items yet to be tested but I expect will be great – cereal boxes and covers from magazines.  The addition of “embossing” really does make an otherwise ordinary looking item look fantastic whilst being good for the crafting budget and the environment.

I would love to hear any other idea’s for what to emboss.

Katrina